How to use Redis Cluster for caching
In this post, we will explore how we can use Redis as a cache layer for our application and as we explore it further, we will see how a Redis Cluster can provide us more scalability and reliability.
TLDR: If you are already familiar with Redis and it's just looking for a way to spin-up a fully configured Redis Cluster using Docker, here is the Github repo. Just clone this repo, go to your terminal, run
docker-compose upand you should be good to go.
What is Redis?
Redis is a key-value store. In rough terms, it works just like a database, but it keeps its data in memory, which means that reads and writes are orders of magnitude faster compared to relational databases like PostgreSQL. It is important to mention that Redis does not replace a relational database. It has its own use-cases and we will explore some of them in this post.
For more information about Redis, have a look at their website here. There you find good documentation and how to install it on your machine. However, we will be building a demo during this post and we will use an interesting setup using Docker and docker-compose that will spin up and configure the entire Redis cluster for you. The only thing you need available is Docker.
Using Redis for caching
Whenever we need fast access to some sort of data, we need to think about ways of keeping this data as close to the application layer as possible. If the amount of data is small enough, It's generally a good idea to keep this data in the local memory so we have instant access. But when we talk about web applications, specially the ones that are stateless and can potentially run in multiple servers, we can't guarantee that the data we need will be present as well as making sure that other servers in your cluster have fast access to this same data.
That is where databases are handy. We can write this data to a central place and other servers can fetch this data whenever they need. The issue with some databases is that if you really need blazing fast access, some of them won't be able to deliver that at bullet speed. Redis is generally the go-to database whenever you need fast and reliable access to specific bits of data. It also provides us with ways to set expiration policies on that data so they are deleted automatically when they expire.
Redis is usually a good choice for storing:
- User sessions
- Authentication tokens
- Rate-limit counters
Redis is by no means limited to the use-cases above, but they fit well when you need fast data access, most often on every request coming through your servers.
What is the point of using a cluster?
It is usually common to start with a single server instance, perhaps connected to a database server which can take you a long way. But once you need to scale you application across different countries and sometimes different continents, it probably means that your application needs to be available 24h a day, 7 days a week. And robustness and reliability needs to be embedded in your application.
You need to start to think about what happens when one of your database servers go down, either because of an issue in the network or because of a faulty hardware. If you have only a single instance you will be dead in the water. If you have backups, it's going to take sometime until you can spin up a new instance, configure it all up to your standards, restore the backup and put it back in business.
If your application is mission critical, you cannot afford to be offline for a few hours. Some applications cannot even be offline for a few minutes in the entire year. This is where a Cluster with replicas can save your skin when a problem like that happens.
A Redis Cluster makes sure that your data is automatically shared across multiple Redis instances, which will give you a higher level of reliability and availability. In case one of those instances experience any kind of failure, the other nodes can still serve content normally for your application.
Spinning up a Redis cluster
I've recently migrated a large web application from using a single Redis instance to a cluster with multiple shards, including multiple replicas. While we are using AWS infrastructure that provides us the entire cluster configuration, I couldn't simply trust that everything would work in production. I had to make sure that we could support a Redis cluster during development, so I've created a setup that spawns several Redis containers and connect with each other automatically to form a cluster.
To connect to Redis from your application, you will need a library that can perform that for you (Otherwise you have to reinvent the wheel). While I've been using IORedis for a nodeJS application in this demo, if you have been using a different language, you will have to look for different connectors like Lettuce for Java or perhaps go-redis for Go.
The entire setup is ready for you in this Github repository here, so you don't have to worry about creating anything from scratch. You can clone it and give it a spin while we will be walking through the files from this repo along the rest of this blogpost.
Creating a Dockerfile
While we will be using the standard Redis image available from Dockerhub to spin up several Redis containers, we still need a way to connect them. That is where we will be building a special container that can issue commands to Redis in a way that it can form a cluster.
at
redis/Dockerfile
we have the following content:
FROM redis:latest

COPY ./entrypoint.sh /entrypoint.sh
RUN chmod 755 /entrypoint.sh

ENTRYPOINT ["/entrypoint.sh"]
We will be using this Dockerfile to build our custom Docker image based on
Redis. The secret sauce here is actually in at
redis/entrypoint.sh.
Let's have a look at this script:
#!/bin/sh

# Using the redis-cli tool available as default in the Redis base image
# we need to create the cluster so they can coordinate with each other
# which key slots they need to hold per shard

# wait a little so we give some time for the Redis containers
# to spin up and be available on the network
sleep 5
# redis-cli doesn't support hostnames, we must match the
# container IP addresses from our docker-compose configuration.
# `--cluster-replicas 1` Will make sure that every master
# node will have its replica node.
echo "yes" | redis-cli --cluster create \
  173.18.0.2:6379 \
  173.18.0.3:6379 \
  173.18.0.4:6379 \
  173.18.0.5:6379 \
  173.18.0.6:6379 \
  173.18.0.7:6379 \
  --cluster-replicas 1

echo "🚀 Redis cluster ready."
Here we are using the redis-cli to issue commands. This command is creating a
cluster and pointing to the specific Redis instances that will be reachable when
we start this script. we are using hard-coded IP addresses here that will be
provided by our docker-compose.yml file later on.
This cluster is composed by 3 shards. Each shard has a master node that is responsible for all the writes, but also a Replica node that holds a copy of the data. A Redis Cluster shard can have up to 500 replicas (at least in AWS). A Replica node has the power to take over and become the Master node if the current Master becomes unavailable.
Now notice that inside of our redis folder we also have a file called
redis.conf. This file will be copied to each Redis container later on so they
can instruct the Redis instance to work as part of a cluster. Let's have a look
at its contents:
# Custom config file to enable cluster mode
# on all Redis instances started via Docker
port 6379
cluster-enabled yes
# The cluster file is created and managed by Redis
# We just need to declare it here
cluster-config-file nodes.conf
cluster-node-timeout 5000
appendonly yes
There is not much going on there. The important part is cluster-enabled yes
which enables our Redis instance to act as part of the cluster. We now need a
way to spin up several Redis containers and make sure that they talk to each
other. At the root folder of our project we have the docker-compose.yml. Let's
have a look:
volumes:
  redis_1_data: {}
  redis_2_data: {}
  redis_3_data: {}
  redis_4_data: {}
  redis_5_data: {}
  redis_6_data: {}
  # This volume is specific for the demo Express application
  # built in this repo. You probably won't need that on your own setup.
  node_modules: {}

services:
  app:
    container_name: express_app
    image: express_app
    build:
      context: .
    environment:
      PORT: 4000
      NODE_ENV: production
      REDIS_CLUSTER_URLS: "redis_1:6379,redis_2:6379,redis_3:6379,redis_4:6379,redis_5:6379,redis_6:6379"
    volumes:
      - .:/app
      - node_modules:/app/node_modules
    command: ["npm", "run", "dev"]
    depends_on:
      - redis_1
      - redis_2
      - redis_3
      - redis_4
      - redis_5
      - redis_6
      - cluster_initiator
    ports:
      - "4000:4000"
    stdin_open: true
    networks:
      redis_cluster_net:
        ipv4_address: 173.18.0.10

  # Here we have six Redis containers with Cluster mode enabled,
  # three of them will work as master nodes and each one of
  # will have a replica, so in case of failures, the replica becomes the master.
  # They are configured by the `cluster_initiator` container.
  redis_1:
    image: "redis:latest"
    container_name: redis_1
    ports:
      - "6379"
    volumes:
      - redis_1_data:/data
      - ./redis/redis.conf:/usr/local/etc/redis/redis.conf
    command: ["redis-server", "/usr/local/etc/redis/redis.conf"]
    networks:
      redis_cluster_net:
        ipv4_address: 173.18.0.2

  redis_2:
    image: "redis:latest"
    container_name: redis_2
    ports:
      - "6379"
    volumes:
      - redis_2_data:/data
      - ./redis/redis.conf:/usr/local/etc/redis/redis.conf
    command: ["redis-server", "/usr/local/etc/redis/redis.conf"]
    networks:
      redis_cluster_net:
        ipv4_address: 173.18.0.3

  redis_3:
    image: "redis:latest"
    container_name: redis_3
    ports:
      - "6379"
    volumes:
      - redis_3_data:/data
      - ./redis/redis.conf:/usr/local/etc/redis/redis.conf
    command: ["redis-server", "/usr/local/etc/redis/redis.conf"]
    networks:
      redis_cluster_net:
        ipv4_address: 173.18.0.4

  redis_4:
    image: "redis:latest"
    container_name: redis_4
    ports:
      - "6379"
    volumes:
      - redis_4_data:/data
      - ./redis/redis.conf:/usr/local/etc/redis/redis.conf
    command: ["redis-server", "/usr/local/etc/redis/redis.conf"]
    networks:
      redis_cluster_net:
        ipv4_address: 173.18.0.5

  redis_5:
    image: "redis:latest"
    container_name: redis_5
    ports:
      - "6379"
    volumes:
      - redis_5_data:/data
      - ./redis/redis.conf:/usr/local/etc/redis/redis.conf
    command: ["redis-server", "/usr/local/etc/redis/redis.conf"]
    networks:
      redis_cluster_net:
        ipv4_address: 173.18.0.6

  redis_6:
    image: "redis:latest"
    container_name: redis_6
    ports:
      - "6379"
    volumes:
      - redis_6_data:/data
      - ./redis/redis.conf:/usr/local/etc/redis/redis.conf
    command: ["redis-server", "/usr/local/etc/redis/redis.conf"]
    networks:
      redis_cluster_net:
        ipv4_address: 173.18.0.7

  # Ephemeral container to create the Redis cluster connections.
  # Once the setup is done, this container shuts down
  # and the cluster can be used by the service app container
  cluster_initiator:
    container_name: cluster_initiator
    build:
      context: redis
      dockerfile: Dockerfile
    tty: true
    depends_on:
      - redis_1
      - redis_2
      - redis_3
      - redis_4
      - redis_5
      - redis_6
    networks:
      redis_cluster_net:
        ipv4_address: 173.18.0.8

  # Web UI to browse through our Redis data across all nodes
  redis_commander:
    image: rediscommander/redis-commander:latest
    container_name: redis_web
    environment:
      REDIS_HOSTS: "local:redis_1:6379,local:redis_2:6379,local:redis_3:6379"
    ports:
      - "5000:8081"
    depends_on:
      - redis_1
      - redis_2
      - redis_3
      - redis_4
      - redis_5
      - redis_6
      - cluster_initiator
    networks:
      redis_cluster_net:
        ipv4_address: 173.18.0.9

# Rename the default network so we can easily identify it
# Across all containers
networks:
  redis_cluster_net:
    driver: bridge
    ipam:
      driver: default
      config:
        - subnet: 173.18.0.0/16
This is a long one, but here is what this docker-compose.yml does:
- Creates a container with our Express application (just for the sake of this demo)
- Creates several instances of Redis
- Configure their IP addresses to match the ones used in our
entrypoint.shscript - Copy the
redis.conffile so they can act as a cluster
- Configure their IP addresses to match the ones used in our
- Creates a cluster initiator container that is only necessary for executing our
entrypoint.shscript and make the cluster connection - Creates a container with the Redis Commander UI which is a nice Web UI for browsing what is stored in our Redis Cluster
Now that we went through this, let's try this out. Go to your terminal and execute:
docker-compose up
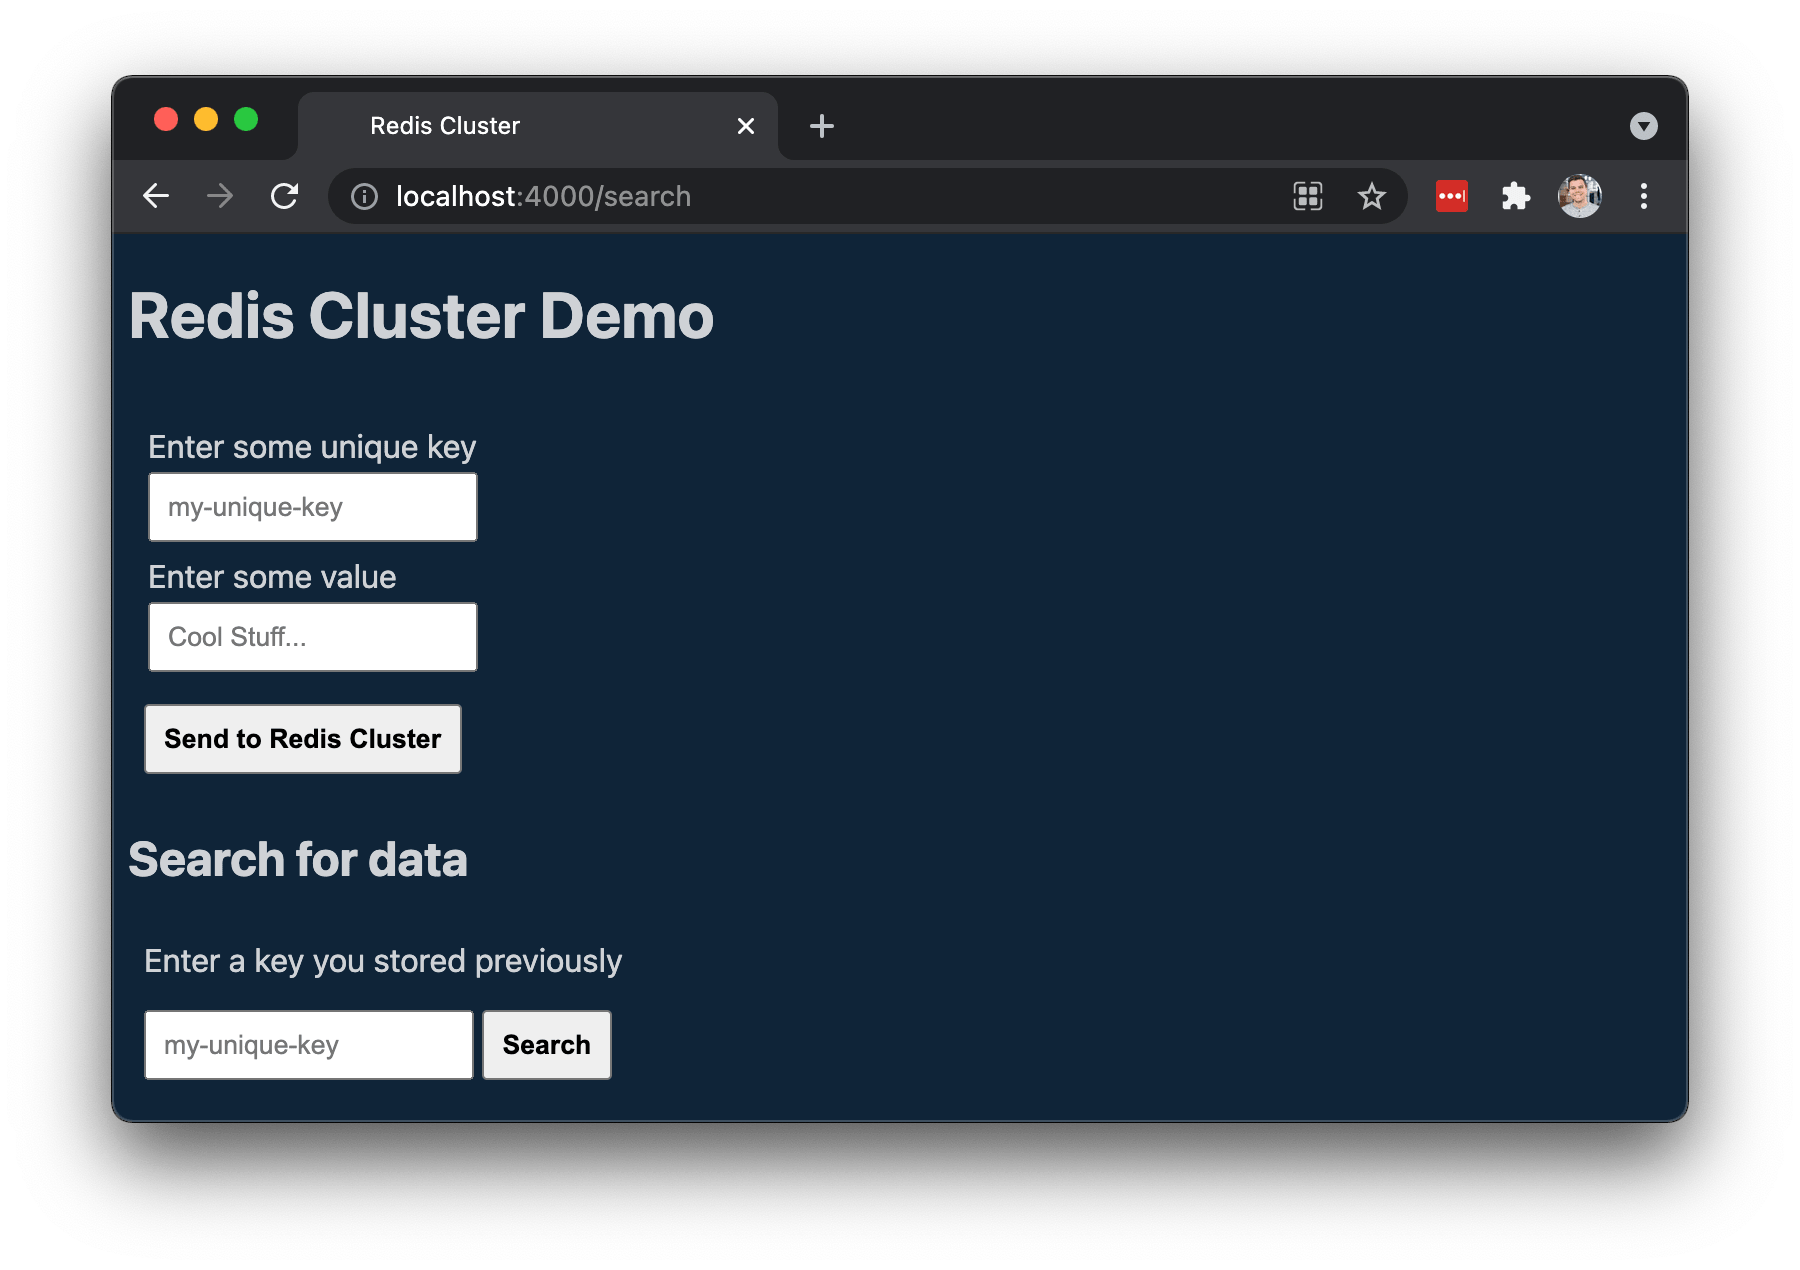
Once everything is ready, you should be able to open your browser and visit
localhost:4000. There you have a demo web application I've built where you can
enter a key/value pair and save it to Redis and also search for a specific key
you have entered before so it can fetch it from Redis and show you the contents
on the screen.
If you are wondering how the connection is setup on the JavaScript side, let's
have a look at our src/service/redisClient.js file.
const Redis = require("ioredis");

/**
 * Get an existing Redis client instance. Build one if necessary
 * @return {Cluster|null} redis client
 * */
function buildRedisClient() {
  try {
    // cluster URLs should be passed in with the following format:
    // REDIS_CLUSTER_URLS=10.0.0.1:6379,10.0.0.2:6379,10.0.0.3:6379
    const nodes = process.env.REDIS_CLUSTER_URLS.split(",").map((url) => {
      const [host, port] = url.split(":");
      return { host, port };
    });

    const client = new Redis.Cluster(nodes, {
      redisOptions: {
        enableAutoPipelining: true,
      },
    });

    client.on("error", (error) => {
      console.error("Redis Error", error);
    });

    // Redis emits this error when an something
    // occurs when connecting to a node when using Redis in Cluster mode
    client.on("node error", (error, node) => {
      console.error(`Redis error in node ${node}`, error);
    });

    return client;
  } catch (error) {
    console.error("Could not create a Redis cluster client", error);

    return null;
  }
}

module.exports = buildRedisClient;
This part is very simple. It reads the cluster URLs from the environment and
creates an instance of Redis.Cluster using the RedisIO library. From there on
we can start issue commands like redis.set, redis.get or redis.exists
across our application. Here is how we do that in the demo Express app within
this repo:
const buildRedisClient = require("./service/redisClient");
const redis = buildRedisClient();

// Have a look at src/index.js for a complete implementation
app.post("/save-data", async (request, response) => {
  const { key, value } = request.body;
  await redis.set(key, value);
  return response.status(201).render("home/index", {
    layout: "default",
    dataSaved: true,
  });
});

app.post("/search", async (request, response) => {
  const { key } = request.body;
  const value = await redis.get(key);
  return response.status(200).render("home/index", {
    layout: "default",
    value,
  });
});
If you would like to explore the data stored in the cluster, go to
localhost:5000 and browse through the Redis Commander UI. There you should be
able see all the Master nodes and explore all keys and values.
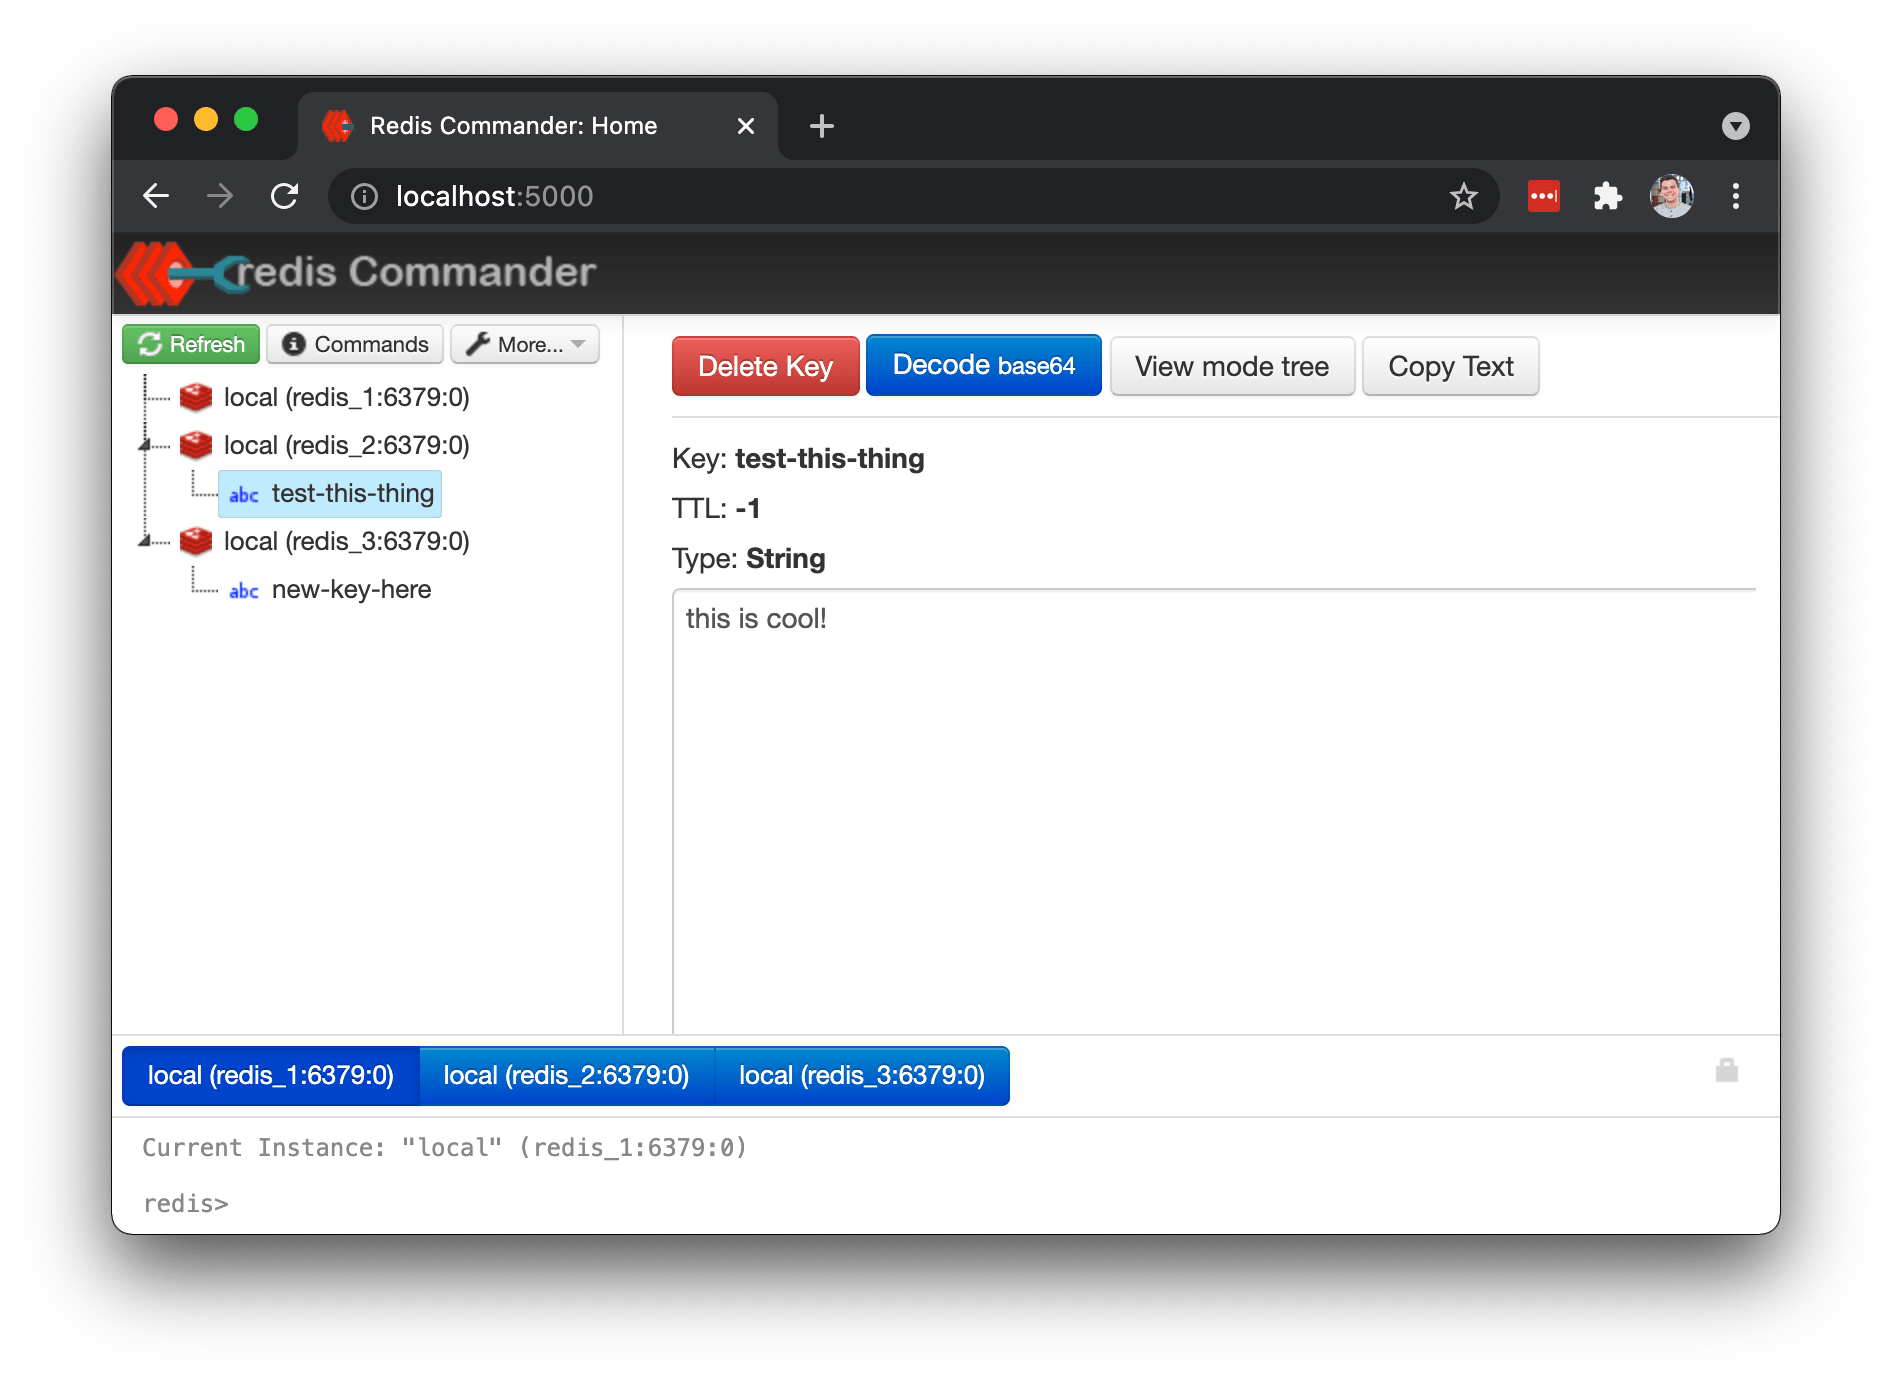
You will notice that some keys are stored in one Master node and other keys are stored in other nodes. This is the data distribution done by Redis, which provides you load balancing across the cluster.
I hope this Docker setup can help your development workflow the same way it did for me and my team recently. Feel free to DM me via Twitter if you have any questions.