Distributed Locks in Node.js
Often times, you need to build a feature that requires coordinated access to a certain resource. A common use-case is around queues where jobs can be enqueued to be processed in the background.
These jobs can either be:
- Picked up by a fleet of workers and processed in parallel. The order they start and finish doesn’t matter.
- Picked up and processed serially. The order they are processed matters.
The first case is generally simple enough. You generally don’t have to concern yourself with race conditions. Jobs can be processed successfully (or failed and retried) in any order they come in.
But what happens when you must guarantee that their processing order be respected? If you have a single server and a single worker thread, then it’s simple. Jobs will be processed serially and their ordering will be respected.
And what happens when you have a fleet of workers deployed across different servers? You will need to “elect” one of your workers to be the one processing these jobs. Better yet, you must make sure that if that worker dies or gets removed from your servers pool, another healthy worker must pick-up the jobs and continue processing them in some sort of handover fashion. This is where a distributed lock algorithm is handy.
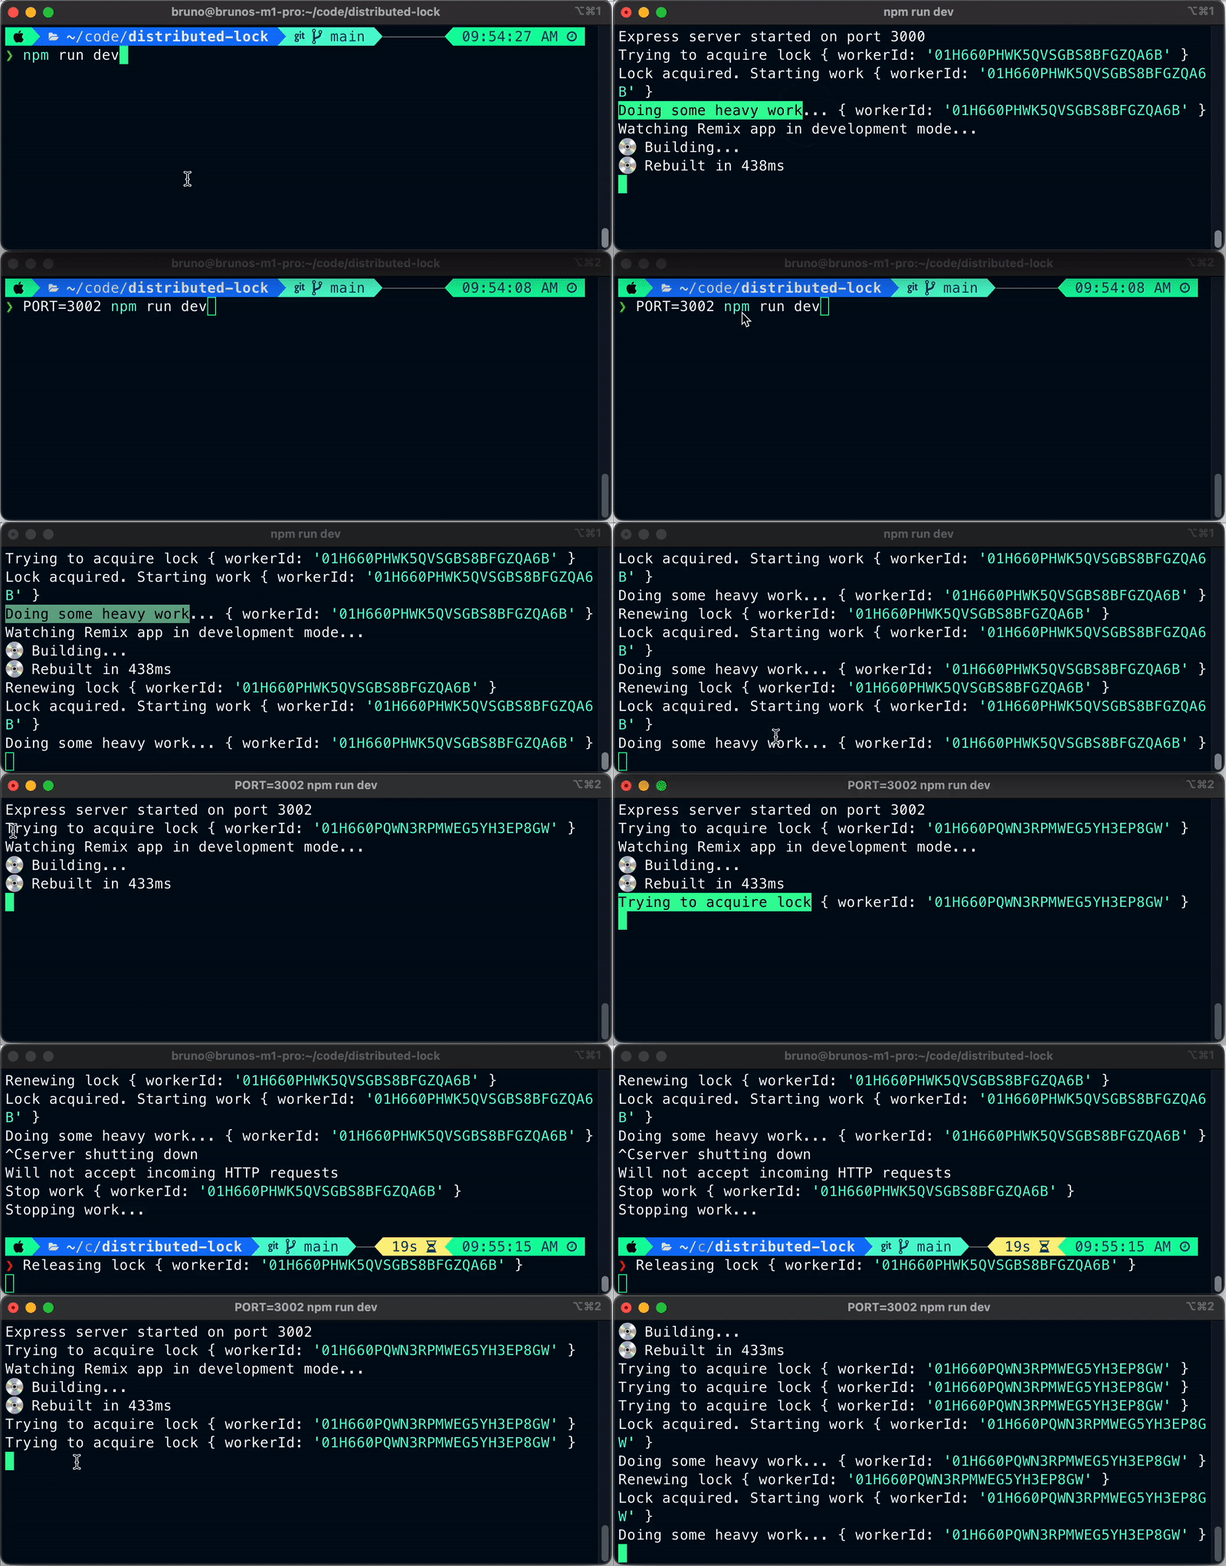
Here is our demo running where we simulate two servers competing to acquire the lock and how the lock handover works when a server goes down:

If you are a savvy Node.js engineer and just want to see the code, here is the Github repo ready for you. Feel free to leave a Github star so folks can find this distributed lock template more easily.
Locks on a single node
A lock is a common mechanism that helps the programmer to restrict access (mutual exclusion) to certain resources, allowing you to control which thread can read or write to shared data.
In a single-thread, event-loop based runtime like Node.js, you generally don’t need locks, but in multi-threaded environments like in Rust, you usually need to use the primitives for atomic operations provided by the standard library like std::sync::Mutex, which guarantees that a given code path is only accessed by one thread at a time.
Primitives like this are super useful, but our use-case goes beyond one single server. Remember that we are crossing the boundaries of a server here and we must make sure that other workers do not process our jobs in case one worker is already processing them.
We need to extend the concept of a lock and make it distributed, where other servers can also see who is holding the lock and act accordingly.
Making our lock distributed with Redis
Given that we must share the lock state across servers, we need some sort of distributed data sharing mechanism that can synchronize this data across our fleet of workers. We could somehow connect our workers and send messages among them, but that would be quite complex to pull it off. Another alternative is to use a shared data store like a database that can make the lock state instantly available across our servers. Redis fits perfectly for that purpose.
Redis is a fantastic technology. If you are not familiar with it, Redis is an in-memory database. It is incredibly fast and can act as a shared cache across your cluster of servers.
Redis provides APIs for atomic operations, which will support us in guaranteeing that only a single worker can acquire a lock at any given time. We will see that in action soon, but this blogpost largely follows the pattern suggested by Redis itself in its patterns manual here called Redlock for cases where we have a single instance of Redis.
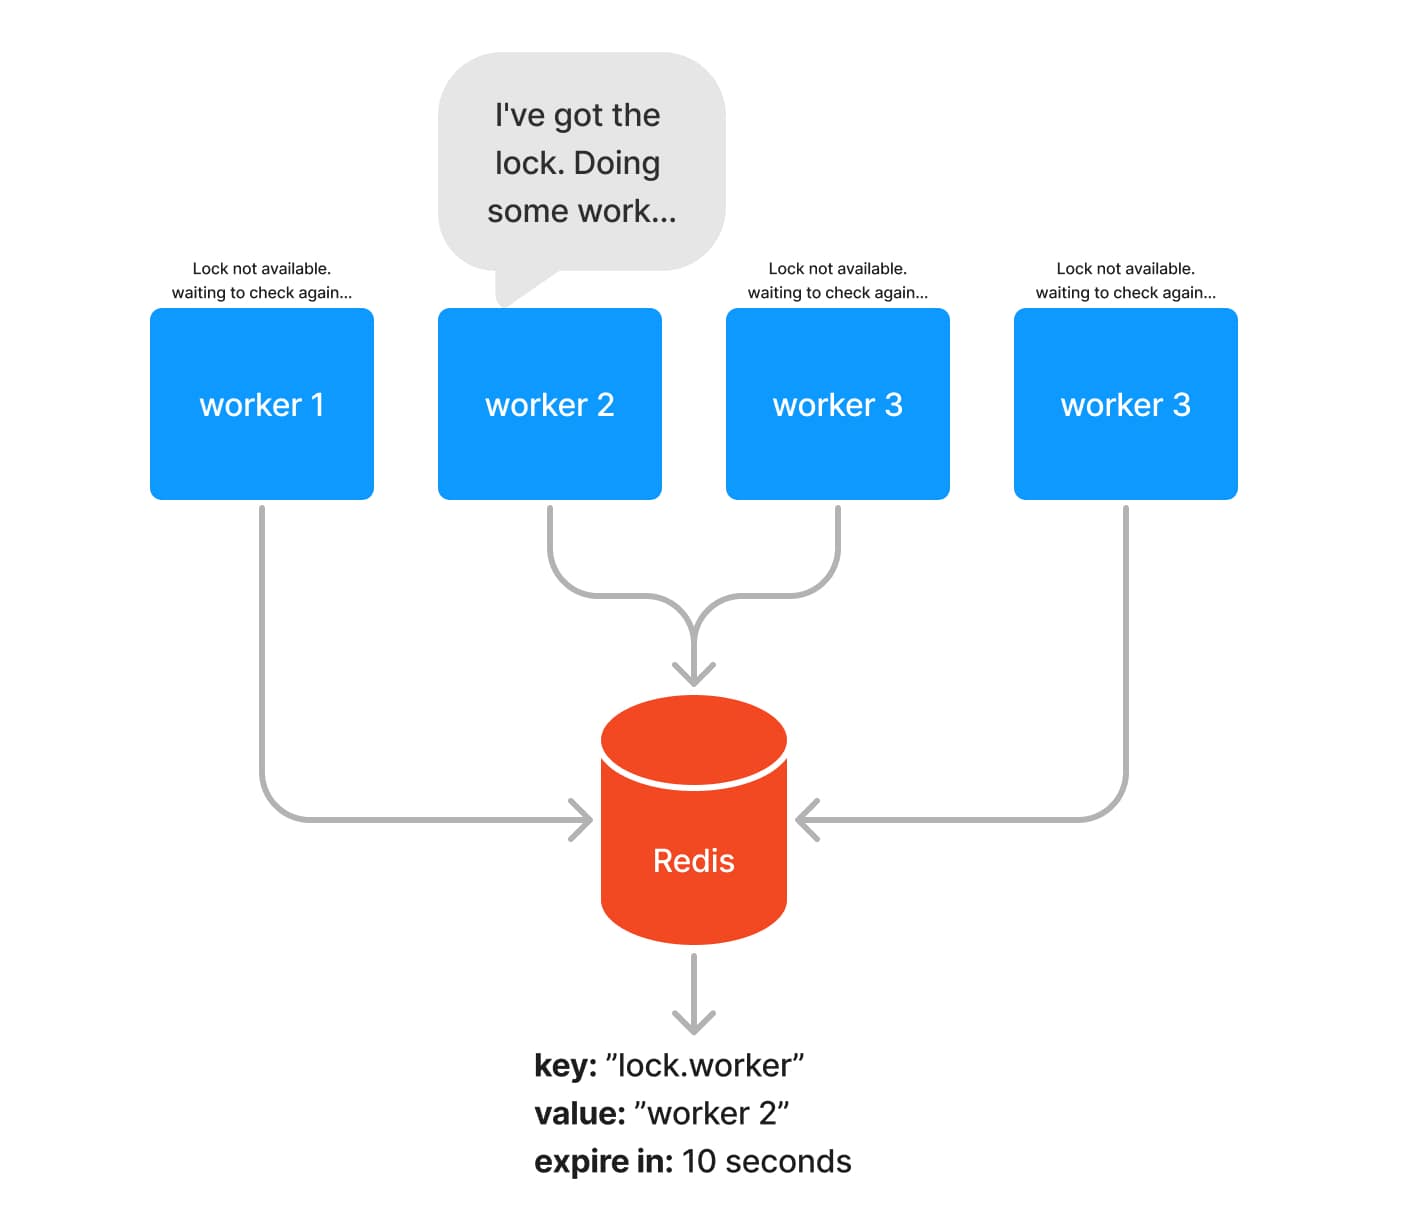
To facilitate the understanding on how the distributed lock works, have a look in the following diagram. We have a pool of four workers which are Node.js servers responsible for processing our hypothetical serial queue. These four servers will concurrently try to acquire the lock by setting a key-value pair in Redis. The first server that manages to do it, “wins” and will hold the lock. With the lock at hand, this server should be able to start processing jobs.

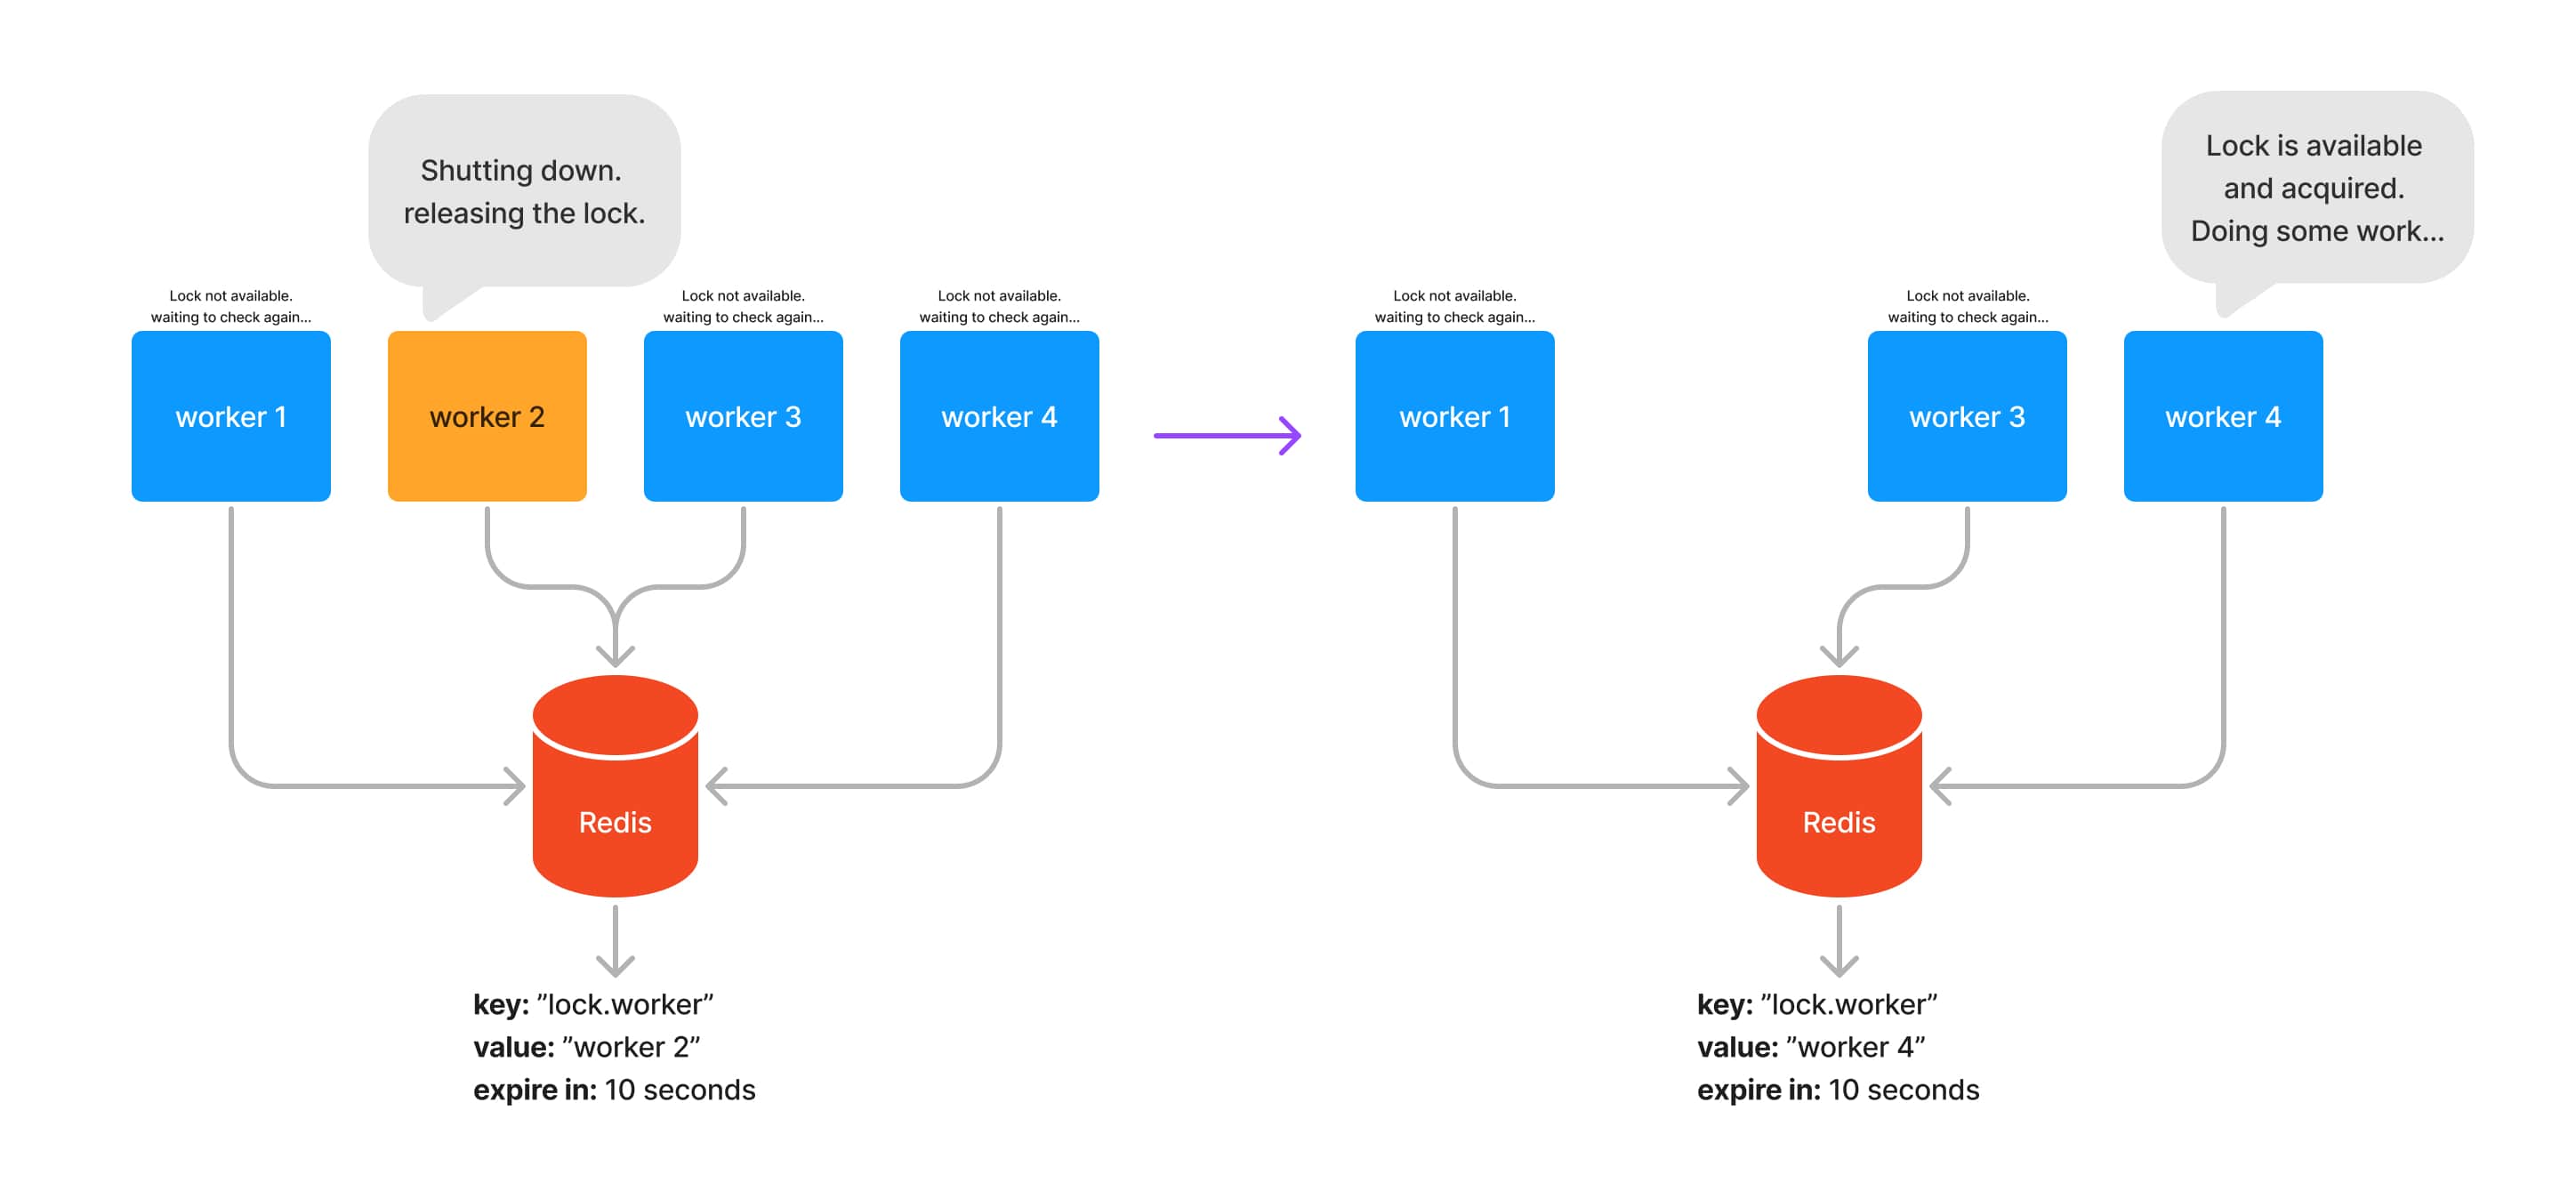
Then, in case this server needs to be shutdown (e.g. during a deployment), the lock should be released, giving the chance to one of the other servers to acquire it and continue to process the background jobs.

Fail-safe with expiring keys
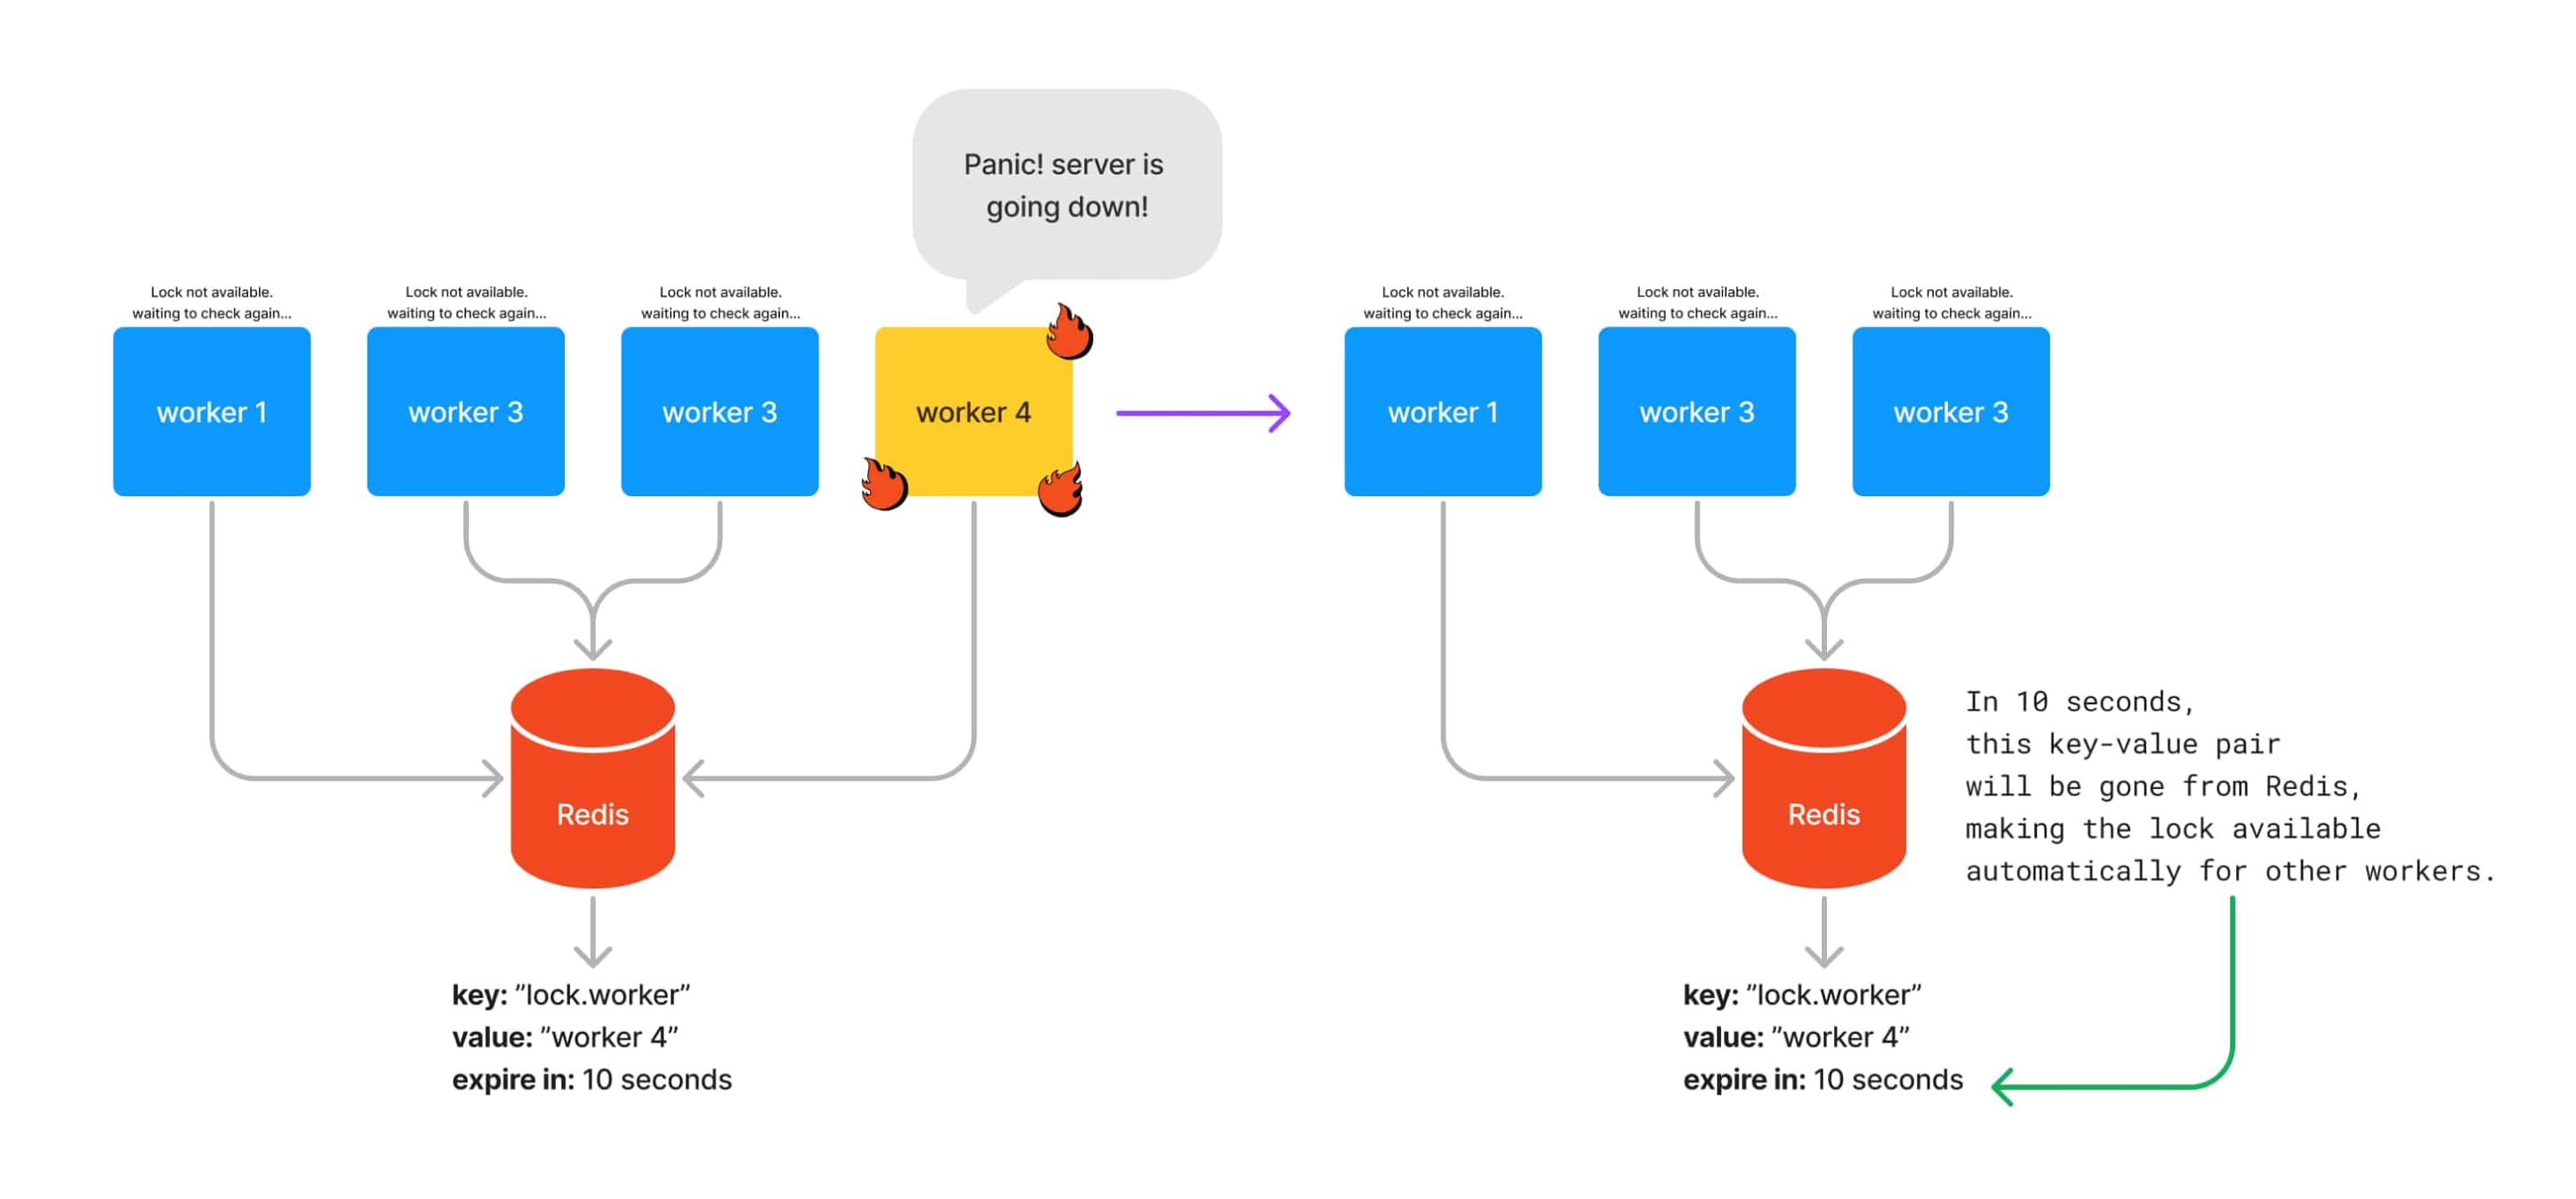
So far, our example has been focusing on releasing the lock when a server needs to shutdown. But what happens during a hardware failure? What if your app panics and crashes out of nowhere? This situation could lead you to a deadlock where no other server from your server pool will be able to acquire the lock to keep processing jobs.
Redis provides a very useful feature where whenever you set a key-value pair, you can also define how long this value can last on its memory. Redis will clean it up automatically after the given time passes.
We will be seeing how to set a key with an expiry time very soon, but here is how it will look like at a high-level:

Renewing the lock from time to time
Given that our lock, represented by the entry we store in Redis, expires automatically after a certain time, we must make sure that our worker that holds the lock can renew the lock from time to time to make sure that it’s still the one holding the lock.
To perform that, Redis also provides an API to specifically change the expiry time of a given key. The EXPIRE command will help us to accomplish that.
But enough theory, let’s dip into the code and see that in action.
Kicking off with a Demo
We start by demonstrating this implementation in action so you get a feeling of how it works and then we will have a look at the code, step-by-step.
To kickstart this project, I’ve used Remix with the
Express adapter so I can
have a super quick project already setup with TypeScript. The code is available
here, so just clone it,
npm install to kick things off.
But before running our Node.js app, we need Redis available as a dependency so
our app can connect to it. The simplest way to install Redis is to use
Docker. Our project already comes with a handy
docker-compose file that bootstraps Redis for you.
So make sure that Docker is running and just execute the following:
docker-compose up -d
This is going to run Redis in the background, which will be a perfect fit for
our app. Now, copy the .env.example file and rename it to .env. This should
be enough for starting our app:
npm run dev
If you watch your server logs, you should see a few logs showing that:
- Your node tried to acquire the lock
- The lock was successfully acquired
- It’s doing some (simulated) work like processing background jobs
Trying to acquire lock { workerId: '01H63B5EAKQZTCDAT8AAVQ9WAG' }
Lock acquired. Starting work { workerId: '01H63B5EAKQZTCDAT8AAVQ9WAG' }
Doing some heavy work... { workerId: '01H63B5EAKQZTCDAT8AAVQ9WAG' }
Now, open a new terminal window and fire up a new process from our Node.js app on a different port with the following command:
PORT=3001 npm run dev
This simulates having another server of your app running and trying to acquire the lock. You will only see that your new process will keep trying to acquire the lock every 5 seconds. You will see logs like the following:
Trying to acquire lock { workerId: '01H63B9M322QAP09D6EJ19SGWC' }
Now, shutdown your app on your first terminal window, the one holding the lock. Have a look at the second terminal window now. It should pick up the lock and start processing the background jobs.
Trying to acquire lock { workerId: '01H63B9M322QAP09D6EJ19SGWC' }
Lock acquired. Starting work { workerId: '01H63B9M322QAP09D6EJ19SGWC' }
Doing some heavy work... { workerId: '01H63B9M322QAP09D6EJ19SGWC' }
This is what we want to accomplish. We want to make sure that our background jobs are never left behind. When a worker goes down, another worker picks it up and continue processing.
Notice that we always log the worker ID, so it’s easy to identify which worker node has the lock and which ones are just waiting and trying to acquire it. The Node ID is a fundamental part of this lock implementation given that we use it to identify which node is actively holding the lock. The Node ID is automatically assigned during server startup time.
Managing our lock state using a state machine
You are probably asking yourself:
How does each node know how and when to acquire the lock or wait to try acquiring it again?
This is where state machines come in. They help us to model our state transitions in a very elegant way.
I personally enjoy using xstate, a finite state machine library that helps us to model how our state looks like and the transition between them, including failure modes.
The folks from Stately, the maintainers of xstate, even provide a Web UI for modeling and visualizing our state machine. Here is how it looks like:

You can also play with this interactive demo here. On this UI, you can simulate all the state transitions and visually see how the state machine works.
Kicking off our state machine during server startup
The main goal of this state machine is to coordinate the following:
- Once our server starts up, we must signal to the state machine that it’s time
to attempt to acquire the lock:
- If the lock is acquired successfully, our worker can start processing the background jobs. In the meantime, our worker also needs to renew the lock to make sure that it can continue processing background jobs.
- In case it can’t acquire it, either because of another worker that has already acquired it or because Redis is unavailable, our worker needs to sit on an idle state for a few seconds and then later on attempt to acquire the lock again.
Don’t worry if you are not familiar with state machines. The xstate introductory article does a fantastic job in introducing you the concept and guides you through creating your first state chart, but let’s walk through the code to see how the entire process works and I will be referencing our demo project with links here so it’s easy for the reader to track it back to the code.
Once we start listening to HTTP requests,
here
we can start our worker with a call to startLockWorker:
httpServer.listen(process.env.PORT, () => {
  console.log("Express server started at port " + process.env.PORT);
  startLockWorker();
});
Now let’s head to the worker implementation of startLockWorker
here:
export function startLockWorker() {
  service.start();
  service.send("TRY_ACQUIRE_LOCK");
}
We have an instance of a service. While you can read more about them
here,
Services wrap our state machines and allow us to observe how the state moves
forward in time, allowing us to hook up callbacks to it and monitor how our
state changes over time.
We first start our service so it listens to events and we immediately send it a
TRY_ACQUIRE_LOCK. This event will kick-off our state machine, which internally
will trigger its internal services to try to acquire the lock. We will have a
look at our actual state machine code soon.
If you look at where we create this service instance, you will see
the following call:
const service = interpret(
  createLockMachine({
    workerId,
    acquireLock: acquireWorkerLock,
    releaseLock: releaseWorkerLock,
    renewLock: renewWorkerLock,
    startWork: consumeResource,
    stopWork: stopConsumingResource,
  })
);
This is effectively where we create an instance of our state machine when
calling createLockMachine. This call takes an object with several parameters:
- workerId: Gives us context on which worker this state machine belongs to.
If you are familiar with React state management,
contextin xstate is similar to React state. When transitioning between xstate “states”, you usually modify its context. - acquireLock: An async callback that tries to acquire the lock. It resolves when the lock is acquired successfully or rejects the promise by throwing an error when it fails.
- releaseLock: An async callback that tries to release the lock. It resolves when the lock is released successfully or rejects the promise by throwing an error when it fails.
- renewLock: An async callback that tries to renew the lock when the worker holds it. It resolves when the lock is renewed successfully or rejects the promise by throwing an error when it fails.
- startWork: An async callback that starts doing the actual background job processing.
- stopWork: An async callback that stops any background job processing. This is important for cases where a worker doesn’t manage to renew the lock so it needs to stop and wait.
These callbacks are our services interface which allow us to make our state machine reusable. We can reuse the same state machine to manage different distributed locks across our application by just creating different instances of it and passing the service callbacks that do the actual business logic.
Now let’s have a look at our state machine:
export function createLockMachine({
  workerId,
  acquireLock,
  renewLock,
  releaseLock,
  startWork,
  stopWork,
}: CreateMachineArgs) {
  return createMachine(
    {
      predictableActionArguments: true,
      id: "lock-worker",
      context: {
        workerId,
      },
      schema: {
        services: {} as Services,
        events: {} as Event,
      },
      initial: "idle",
      on: {
        STOP: "cleanup",
      },
      states: {
        idle: {
          on: {
            TRY_ACQUIRE_LOCK: "acquiring_lock",
          },
        },

        cleanup: {
          invoke: {
            src: "stopWork",
            onDone: {
              target: "releasing_lock",
            },
            onError: {
              target: "releasing_lock",
            },
          },
        },

        acquiring_lock: {
          invoke: {
            src: "acquireLock",
            onDone: {
              target: "working",
            },
            onError: {
              target: "waiting_to_acquire_lock",
            },
          },
        },

        working: {
          invoke: {
            src: "startWork",
          },
          after: {
            "5000": {
              target: "renew_lock",
            },
          },
        },

        renew_lock: {
          invoke: {
            src: "renewLock",
            onDone: {
              target: "working",
            },
            onError: {
              target: "pause_work",
            },
          },
        },

        pause_work: {
          invoke: {
            src: "stopWork",
            onDone: {
              target: "waiting_to_acquire_lock",
            },
            onError: {
              target: "waiting_to_acquire_lock",
            },
          },
        },

        releasing_lock: {
          invoke: {
            src: "releaseLock",
            onDone: {
              target: "idle",
            },
            onError: {
              target: "idle",
            },
          },
        },

        waiting_to_acquire_lock: {
          after: {
            "5000": {
              target: "acquiring_lock",
            },
          },
        },
      },
    },
    {
      services: {
        acquireLock: (context, _event) => {
          console.log("Trying to acquire lock", { workerId: context.workerId });
          return acquireLock();
        },
        renewLock: (context, _event) => {
          console.log("Renewing lock", { workerId: context.workerId });
          return renewLock();
        },
        releaseLock: (context, _event) => {
          console.log("Releasing lock", { workerId: context.workerId });
          return releaseLock();
        },
        startWork: (context, _event) => {
          console.log("Lock acquired. Starting work", {
            workerId: context.workerId,
          });
          return startWork();
        },
        stopWork: (context, _event) => {
          console.log("Stop work", { workerId: context.workerId });
          return stopWork();
        },
      },
    }
  );
}
Ok, don’t be overwhelmed. This is how xstate lets us declare our state machine. It’s mostly a JavaScript object with a specific structure.
The main thing you want to watch out for is how our machine transition from one
state to another. Let’s have a look at what happens when our machine enters the
acquiring_lock state:
acquiring_lock: {
  invoke: {
    src: "acquireLock",
    onDone: {
      target: "working",
    },
    onError: {
      target: "waiting_to_acquire_lock",
    },
  },
},
When it enters this state, it invokes the source (src) service called
acquireLock. In our case, service calls are async functions that when resolved
successfully will use the onDone transition and will move to the target
state, which in this case is working.
If the promise returned by this callback rejects, it will enter the onError
block and will transition to the waiting_to_acquire_lock state.
Let’s have a look at the working state
here:
working: {
  invoke: {
    src: "startWork",
  },
  after: {
    "5000": {
      target: "renew_lock",
    },
  },
},
First, notice that it does not have any target states in the invoke clause.
This is by design given that when our worker is performing background job
processing, we want it to remain that way for as long as it can. But it does
have a src service called startWork. This is our service callback that
allows our worker to effectively start processing the background jobs.
Also notice that we have an after block. This is how xstate lets us declare
state transitions that will trigger automatically after a given period of time.
In this case, whenever our state machine is on the working state, after 5
seconds, it will transition to the renew_lock state.
Let’s head to the renew_lock state
here:
renew_lock: {
  invoke: {
    src: "renewLock",
    onDone: {
      target: "working",
    },
    onError: {
      target: "pause_work",
    },
  },
},
This state is interesting. It will invoke a service called renewLock and in
case it succeeds, it will transition back to the working state, which will
give a chance to our worker to keep chugging along with our background jobs. For
the cases where it fails, our target state is pause_work which in turn also
has a src service that notifies our worker to stop any background processing.
After this tour, you might be wondering how these string identifiers are turned
into function calls? Let’s have a look at our services section in our state
machine:
{
  services: {
    acquireLock: (context, _event) => {
      console.log("Trying to acquire lock", { workerId: context.workerId });
      return acquireLock();
    },
    renewLock: (context, _event) => {
      console.log("Renewing lock", { workerId: context.workerId });
      return renewLock();
    },
    releaseLock: (context, _event) => {
      console.log("Releasing lock", { workerId: context.workerId });
      return releaseLock();
    },
    startWork: (context, _event) => {
      console.log("Lock acquired. Starting work", {
        workerId: context.workerId,
      });
      return startWork();
    },
    stopWork: (context, _event) => {
      console.log("Stop work", { workerId: context.workerId });
      return stopWork();
    },
  },
}
This is the second argument to the createMachine call. Notice that the key
names here all match with the src we’ve seen before. This is where we connect
the callbacks we’ve given to our lock machine function signature and our state
machine. This is the abstraction that allows us to make our state machine
flexible and reusable across our app.
Redis expiring keys in action
We’ve gone through our state machine and saw how the lock callbacks are being
called, but how are we making sure that Redis is operating the way we expect?
Let’s have a look at how we set and update the expiry time of our keys using
ioredis.
Let’s head to our acquireLock function
here:
export async function acquireLock(
  lockKey: string,
  lockValue: string,
  expireAfterInSeconds: number
): Promise<boolean> {
  const result = await redis.call(
    "set",
    lockKey,
    lockValue,
    "NX",
    "EX",
    expireAfterInSeconds
  );

  return result === "OK";
}
Here we are using native redis commands to set our key. The secret sauce is
within the NX and EX arguments:
- NX: set if Not eXists. Returns ‘OK’ on successful cases, null otherwise
- EX: set with expiration time. The key will be removed after the elapsed time (given in seconds)
This is a fundamental part of this implementation. Redis allows us to have keys that automatically expire and get deleted from its memory, which guarantees that we won’t face lock contention. This covers the eventual case where a server crashes and don’t get the chance to release the lock, which would cause a major issue for all our other workers that would be forever waiting to acquire the lock.
Renewing the lock by extending the expiry time
Whenever our worker holds the lock, it attempts to renew the lock from time to time. This is also covered by a Redis API. let’s have a look at our renewLock function here.
export async function renewLock(
  lockKey: string,
  lockValue: string,
  expireAfterInSeconds: number
): Promise<boolean> {
  const result = await redis.get(lockKey);

  // Lock is available, we can attempt to acquire it again.
  if (result === null) {
    return acquireLock(lockKey, lockValue, expireAfterInSeconds);
  } else if (result === lockValue) {
    // Lock is still held by this worker
    // we can safely renew it by extending its expiry time
    await redis.expire(lockKey, expireAfterInSeconds);
    return true;
  } else {
    throw new Error(
      "Lock held by another node. Can neither renew or acquire it"
    );
  }
}
Here we use the ioredis API for expiring keys. This API allows to either
eliminate keys from Redis immediately if we set the expiry time to zero or to
extend the expiry time of an existing key for the given seconds.
This is exactly what we do here. Whenever our worker holds the lock, we just
extend the expiry time. Notice how the workerId plays a major role here. We
use it as the lockValue. This way we make sure that only the worker holding
the lock can safely renew it.
Where to go from here
I acknowledge that I mostly glanced over most of the concepts here, but the important thing is that you now have all the building blocks to build a distributed lock in Node.js, including a demo project (available here) that you can use as a reference.
Though, one step further on this demo is to increase the availability of our Redis instance. Right now, we deal with only a single instance of Redis, but what happens if Redis goes down? To improve this implementation, you should look into having a Redis cluster with multiple master nodes. That is where you would actually implement the Redlock algorithm on its full capacity.