iOS push notifications for Rails Developers
While creating mobile applications, one of the the main features that we can explore is the Notification. Basically, there are two types of notification:
-
Local Notifications: Are stored on the phone and there is no need for internet connection.
-
Push Notifications: We need to implement a service in our backend to send those messages to the Apple Push Notification Service(APNS), which will send the notification to the client's device.
In my last iOS App, I needed this feature working well with my backend, a Rails application, and I feel like I will have to read those steps again in the future to refresh my memory. The focus here is just about Push Notifications. I will write a post about Local Notifications.
Requirements
- Xcode 6.4 or higher
- Apple Developer Account
- iPhone, iPad or iPod (The iOS Simulator does not allow Push Notifications)
- iOS 8 or higher
Walkthrough
To reach our goal, we need to follow the following steps:
- Send the device token to our backend(each device has a unique token for each application)
- Setup our iOS app to receive Push Notifications
- Setup SSL Certificates on the Apple Dev portal
- Setup our backend application using the APNS gem.
- Send notifications from our Backend to APNS
#1 Step: iOS App
We need to ask user permission to send him notifications. We can do it with the following code:
func application(application: UIApplication, didFinishLaunchingWithOptions launchOptions: [NSObject: AnyObject]?) -> Bool {

   // Register for push notifications
   let notificationTypes: UIUserNotificationType = .Badge | .Sound | .Alert
   let notificationSettings = UIUserNotificationSettings(forTypes: notificationTypes, categories: nil)
   UIApplication.sharedApplication().registerUserNotificationSettings(notificationSettings)
   // Ask user permission
   UIApplication.sharedApplication().registerForRemoteNotifications()

   return true
 }
As soon as our application starts, it will popup an alert and ask the user if he allows us to send notifications. For now on, we need to get the device token and send it to out backend.
func application(application: UIApplication, didRegisterForRemoteNotificationsWithDeviceToken deviceToken: NSData) {
 // Create and Store the device token on local database and send
 // Token to backend API
 // 1:
 // remove "<" and ">" from the string
 let trimEnds = token.description.stringByTrimmingCharactersInSet(NSCharacterSet(charactersInString: "<>"))
 // 2:
 // remove spaces
 let cleanToken = trimEnds.stringByReplacingOccurrencesOfString(" ", withString: "", options: nil)

 //Send the cleanToken to your WebServer(network call)
}

// If the user does not allow push notifications, this method will be called
func application(application: UIApplication, didFailToRegisterForRemoteNotificationsWithError error: NSError) {
 NSLog("Failed to get token. Error: %@", error)
}
Caution: We have to notice that the device token can be changed at any time. Apple can assign a new token at any moment, so we should always check if the device token is updated in our backend. I will show you how to get this token, but how to update it in your backend is up to you.
#2 Step: Request SSL Certificates
We have to create a App ID for our iOS App. Go to the Apple Dev Portal - Apple App ID Page
- Alert: We have to create an "Explicit App ID" because anything different than that will not allow us to use the Push Notification Service
When filling the and remember to check "Push Notifications" in the "App Services" area. Get done with the form, go to the App ID list and select the App ID that was just created and click edit to generate the SSL Certificates.

Those SSL Certificates will be used in our Backend to authenticate with Apple Push Notification Service(APNS). Click in create certificate for both Development SSL Certificate and Production SSL Certificate because we will need a certificate for each environment(Development and Production). Follow the creation instructions for each certificate and download both the Development SSL Certificate and Production SSL Certificate. After download it, double click each one to add them to the Keychain Access.
#3 Step: Export SSL Certificates from Keychain
Now that we have our certificates, we have to convert them in a format the is compatible with our backend. We ca do it following the steps bellow:
- 1: Open the Keychain;
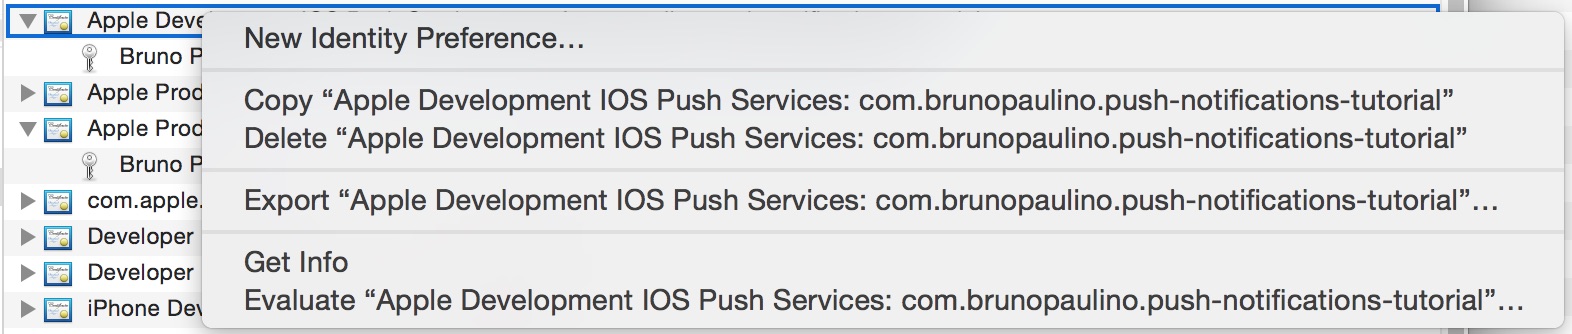
- 2: Select "Certificates"
- 3: Right click over the certificate where you see something like this: Apple Development Push Services: com.yourname.appname and click on Export
- 4: On the dialog box, make sure to select Personal Information Exchange(.p12) format before save.
Repeat the same steps for the production certificate.
#4 Step: Convert certificates to .pem format
Based on the APNS gem documentation, we open the terminal and execute the following commands inside the folder where the certificates are:
# Development
$ openssl pkcs12 -in development.p12 -out development.pem -nodes -clcerts

# Production
$ openssl pkcs12 -in production.p12 -out production.pem -nodes -clcerts
#5 Step: Install the APNS gem
Assuming we already have our Rails backend with a Device model with the token string, we are going to send out our notifications from the server to the APNS in out controller. In this example, I will simulate the creating of a blog post that will send a notification to the users that are using the blog app for iOS.
First, add the APNS gem in your Gemfile:
gem "apns"
Now, in the terminal, execute:
$ bundle install
#6 Step: Setup Environment (Development and Production)
While our iOS App is still in development, we need to send notifications to the APNS host: gateway.sandbox.push.apple.com using the development.pem certificate. However, after submitting the App to the App Store, we need to send push notifications to the APNS host: gateway.push.apple.com using the production.pem certificate.
Copy and paste the development.pem and production.pem files in your Rails app folder. fell free to put it wherever you want, just make sure to know the path for those files. Create a file called config/initializers/apns.rb and put this code:
# config/initializers/apns.rb
# Default value is 'gateway.sandbox.push.apple.com'
APNS.host = "gateway.sandbox.push.apple.com"
# Path to your development.pem file
APNS.pem = File.join(Rails.root, "development.pem")

# if your iOS App is available on the App Store, Use the production.pem
# and change the host
if Rails.env.production?
  APNS.host = "gateway.push.apple.com"
  APNS.pem = File.join(Rails.root, "production.pem")
end
#7 Step: Send Push Notifications
Now that we have our environment already set up, we can easily send out the notifications:
class PostsController < ApplicationController
  def create
    post = Post.new(post_params)
    # Get all devices stored on your database
    # or filter based on your criteria
    devices = Device.all
    notifications = devices.map do |d|
      APNS::Notification.new(d.token,
      alert: post.title,
      other: 'Here, you can pass custom info to your app')
    end
    APNS.send_notifications(notifications) if !notifications.empty?
  end

  protected
    def post_params
      params.require(:post).permit(:title, :content)
    end
end
#@ Last Step: Receive the Notifications on the iOS App
Remember that we need an Apple Device to test this feature. We just need to implement a delegate method in the AppDelegate.swift
func application(application: UIApplication, didReceiveRemoteNotification userInfo: [NSObject : AnyObject]) {
  // Do whatever you want with this notification
  // Ex: Reload data from server
  NSLog("remote Notification: %@", userInfo)
}
We are done!
Remember that the Apple Push Notification Service does not guarantee the delivery of those notifications, which means that you can not really on those notifications. the Apple Docs is pretty cool. You should give it a shot.